ArtWalk Santa Fe is run by a small team of dedicated artists. We started this project because we wanted these events to exist for ourselves, our creative friends, and our local community of artists. There is no big anonymous company running things behind the scenes, just our little three person team (plus a crew of lovely volunteers who help set up and lug heavy objects on market days). Over the next few posts, we’ll be introducing ourselves, starting with co-founder Alex Streeper. If you’ve seen our Artist Spotlight series, this interview format and the questions might look familiar. That’s because we’re all artists ourselves, so in the spirit of taking our own places in the Santa Fe arts community, we’re answering them too.
ArtWalk: When did you start making art, and what prompted your creativity?
Alex Streeper: I started embroidering when I was a kid in elementary school. I went to a Catholic school in Mexico and that’s one of the activities that the nuns would make you do as part of the arts class. I learned to do flower beaded bracelets also in elementary school, but I don’t remember who taught me. I stopped embroidering and beading after middle school, and came back to it in 2020 during the pandemic, when everyone was looking for something to do while we were in lockdown.
AW: Where do you most frequently create your art? Is it a dedicated space, outdoors, somewhere in your home, shared with other uses?
AS: At my house. First it was on my dining room table, but the more I created the more space I needed, so I turned our living room into my studio and now I have projects all over.
AW: Other than at ArtWalks, where can people find your artwork, either in person or online?
AS: In person, you can often find me at the Mercado Southside, and some of my bigger pieces are for sale at the Historic Santa Fe Foundation’s gift shop. Online, you can find me on Etsy at Alita’s Mexican Curios.
AW: What are your goals and dreams as an artist going forward?
AS: I would like to create art pieces that you can hang on your wall, not only wearables. I’m working on a beaded piece as part of a collection of 3 pieces (one done, two to go). I would like to see them on display at a gallery some day.
AW: Tell us more about your art – for example, what is your favorite medium, what styles do you like to work in, are there themes you follow?
AS: Embroidery on felt is my favorite medium, and the one I do most often. Adding beads gives it an extra shine. My style is Mexican folk, so lots of bright colors all over the place.
AW: What advice would you give to other artists that are just starting?
AS: Sometimes you’ll like what you created, sometimes you won’t, but you should still put everything out there… you’ll be surprised to find out that some people like those pieces that you thought were ugly or bad. There are so many people out there, tastes vary. Also, sometimes inspiration won’t come, so just sit down and start something, no matter what, and see where that takes you… Inspiration might just arrive by surprise.
AW: Do you have a most used tool or tip that other artists should know about?
AS: I’ve found that clear E6000 is the best glue to bind the front of the piece to the backing (not the fabric glue, which separates easily). Also a pair of manicure scissors are the best for making precise cuts to the felt when trying to shape the piece.
AW: What is your favorite color?
AS: Pink and red, they give everything a fun pop of color!
AW: Do you have any favorite artists? If they’re living and active, feel free to tag them so we can all see!
AW: What are your thoughts on and experiences with ArtWalk and vending so far?
AS: I’m one of the organizers so I’m biased. I like that every event is different so it feels like you’re attending a new event every time. Also the rotating of the artists makes it so we can grow a bigger, more exciting community + I get to meet new creative people and pick their brains all the time.
Creating opportunities for artists to get their work out into the world is why we started ArtWalk Santa Fe. Setting up as a vendor at events like ours (no need for monogamy here, we’re so happy to see you grabbing every opportunity!) is a great way to showcase your talent, but the supplies and setup can seem daunting if you’ve never done it before. Worry not, artist friends, ArtWalk is here to guide you through it.
In this guide, we’ll walk you through the must-have items to make your outdoor craft fair experience both enjoyable and profitable. The primary focus of this post is as a resource for people just starting out and creating a setup from scratch, but we think that even veteran craft show stars can pick up some tips to further improve their setup.
If the thought of investing a lot of money and storage space into a full show setup all at once is overwhelming, fear not – it is possible to start with just a table (even borrowed or upcycled!) and build up from there. Just as your craft evolves over time, so too will your display setup. For additional research beyond this list, we recommend checking out local shows of interest to find out what they require (and what they provide to vendors), as well as talking to fellow artists about what works for them.
ArtWalk Santa Fe, for example, usually offers two sizes of space: a “table spot” that is meant for a 6′ folding table or equivalent size combination of displays/racks, and a “tent spot” which is meant for a 10’x10′ pop-up tent and whatever you can fit underneath it. Because we change locations throughout the year, the space offerings tend to vary, but we try to break each location down into these two base sizes as we find they are easy for most people and offer a good variety while working across a lot of spots. A very new artist can start smaller with just a table to dip their toes in, and have simpler logistics to deal with.
Throughout this post, we will be sharing affiliate links to some recommended options. ArtWalk receives a small commission if you purchase through these links, but the price stays the same for you. None of our recommendations are sponsored, they are all things we use ourselves and find useful or observe event participants liking.
1. Tables and Tablecloths: The Base
Tables are the foundation base of most show setups, so choose them wisely. Sturdy folding tables are ideal for supporting your products and engaging with customers while also being easily portable. A table that is 4’ or 6’ wide is a good standard starting size, and can be combined with other tables or floor stands to fill a larger space when you are ready for one.
Complement your tables with attractive tablecloths to enhance your booth’s visual appeal. Think about color coordination and how the tablecloth can serve as a backdrop for your creations without distracting from them. Usually a simple solid color such as black or white is a safe bet. There are elastic tablecloths which attach around the base of a folding table’s legs for a fully polished look, but even just a length of thrifted fabric can provide an excellent start.
It’s possible to get away without a tent at events at first, especially with a small setup, but we strongly advise getting one if you think you’ll do multiple outdoor events. This provides shelter from the elements, be it harsh sun or unexpected rain, protecting both you and your artwork. Opt for a tent that is easy to set up and take down, and ensure it’s the right size to accommodate your display and working space. It is tempting to buy the cheapest option to start with, but we strongly recommend going just a bit up in quality, as the price difference is much smaller than the difference in quality, and a cheap tent can easily break on the first or second use which is both a bummer and a potential danger if it happens during an event.
Just as important as the tent itself is a good set of weights to hold it down in case of wind. It is often not possible in a market setting to stake down a tent, so weights are a more universally reliable option.
Some events out there require everyone’s tents to be white, which is also the most common base color out there, making it a safe and easy choice. However, a colorful or branded tent can be a great upgrade for standing out.
ArtWalk recommends: A good white tent (this one comes with sandbags to fill as weights) and an individual set of weights
3. Display Materials: Showcasing Your Art
Creative and eye-catching displays are essential to draw visitors to your booth. Utilize shelves, racks, and stands to showcase your art at different heights and angles. This adds visual interest and allows customers to engage with your creations more intimately. This category is very art medium specific – what works for a potter will be different from what’s effective for a painter or a jeweler! Having items standing up and at a variety of heights can make a big difference. Even just boxes with cloths draped over them will give you different elevations to work with.
No matter what you’re showing off, try to find or make displays that have steady, heavy bases (or can be weighted down) so they don’t fall over due to wind or people checking out your items. It should be easy for your customers to see what you have available and browse through it.
Capture the essence of your brand with well-designed signage. A banner or a prominently displayed sign with your name and logo is an effective way to make your booth easily recognizable from a distance. This can range from a hand painted board to a professionally printed banner and items you sell with your designs on them.
Canva is a great tool for quickly and easily putting together professional looking signage with no graphic design background, plus it’s free to use!
For our Santa Feans, there are numerous local businesses who happily work with artists to print up their dreams, including:
Along with such nationwide options as Office Depot.
6. Lighting: Shine a Spotlight on Your Creations
Outdoor craft fairs often extend into the evening hours. Ensure your booth stands out even after sunset with proper lighting. Battery-operated LED lights, string lights, or clip-on spotlights can accentuate specific pieces and create a warm and inviting ambiance. It is best not to rely on the availability of an electrical outlet, as they are frequently not available in outdoor settings, and instead opt for battery operated options to ensure you are self sufficient.
7. The Checkout Process: Cash Handling and Packaging
Don’t overlook the practical side of things. Have a secure cash box or a point-of-sale system in place to facilitate smooth transactions. Additionally, provide shopping bags or eco-friendly packaging options for customers to safely carry their purchased items – these can even be reused from your own stash of purchase packaging.
You’ll want to make it easy for your customers to pay you, so consider which form(s) of payment will work for your situation. The three most popular options are cash, Venmo and Square card readers. Venmo and Square can both be used on the phone you likely already have with you, and in the case of Square there are free (and affordable upgrade) card readers available to connect to your phone for extra ease.
8. Promotional Materials: Stay Connected
Consider offering business cards, postcards, or brochures that visitors can take with them, or to tuck in with purchases. Include your contact information and social media handles to stay connected with potential customers after the event. Building a strong online presence can lead to ongoing sales and commissions. In addition to the local Santa Fe printers mentioned in #4, cards and promotional materials can easily be printed at such websites as Vistaprint and Moo.
10. Keep It Organized
Now that you’ve got all your inventory made and displays ready, you’ll want to keep it all organized and easy to transport back and forth to events. Here is where you’ll want some good quality bins, totes and boxes for protecting everything in transit – and an easy-to-fold cart helps spare you lugging heavy boxes.
We’ve also put together a checklist to help you ensure that you always have everything you need packed and with you! Access and customize it here.
Finally, remember that your personal touch and enthusiasm are your best assets. Engage with visitors, share the stories behind your creations, to create a memorable experience that goes beyond a simple transaction. Don’t be afraid to show up with just a table, handful of items, and a smile.
Are you an artist with more tips and tricks for your fellow vendors? Share them below in the comments! We’d love to hear what works (and doesn’t work) for you, and will update this guide as we find new and better ideas.
Not to toot our own horn too much, but we think participating in an ArtWalk Santa Fe event is a fantastic opportunity to showcase your artistic prowess and connect with art enthusiasts. By investing in the right supplies and creating an inviting booth, you’re setting the stage for an experience that leaves a lasting impression on attendees. So, gather your materials, channel your creativity, and join us at an upcoming event soon!
Central to the whole project of ArtWalk Santa Fe is people. The artists who bring their work to our events are the reason for our existence and the source of ArtWalk’s success. We’ve grown very fond of our artists, and so are embarking on a series of spotlight posts to shine a light on different members of our art community.
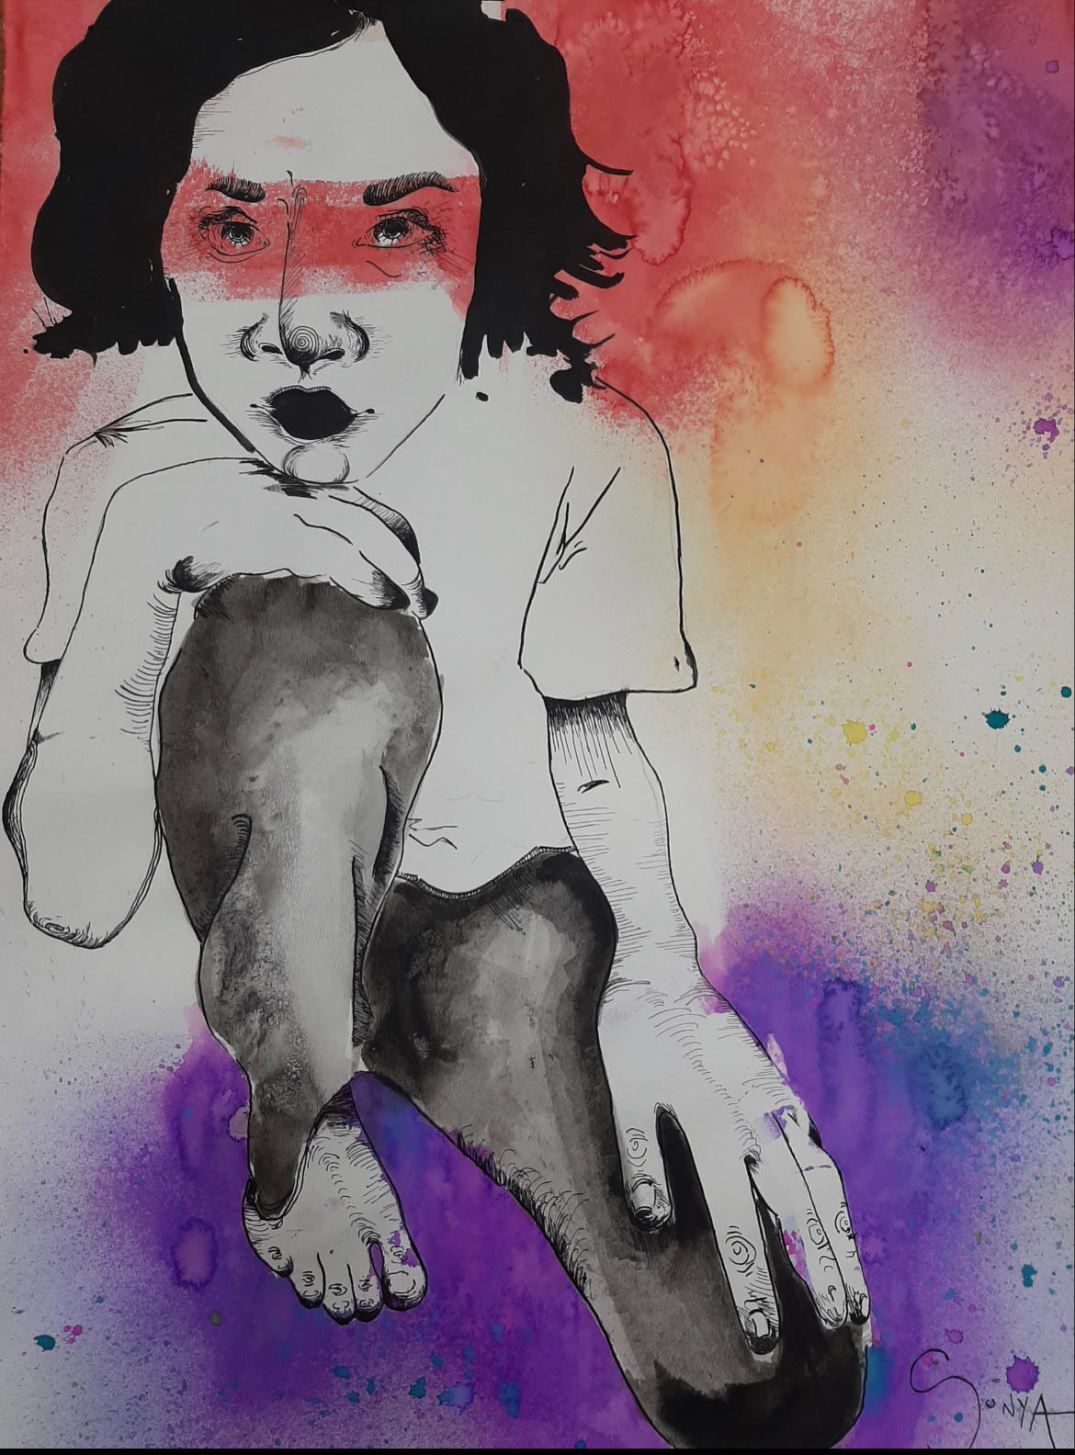
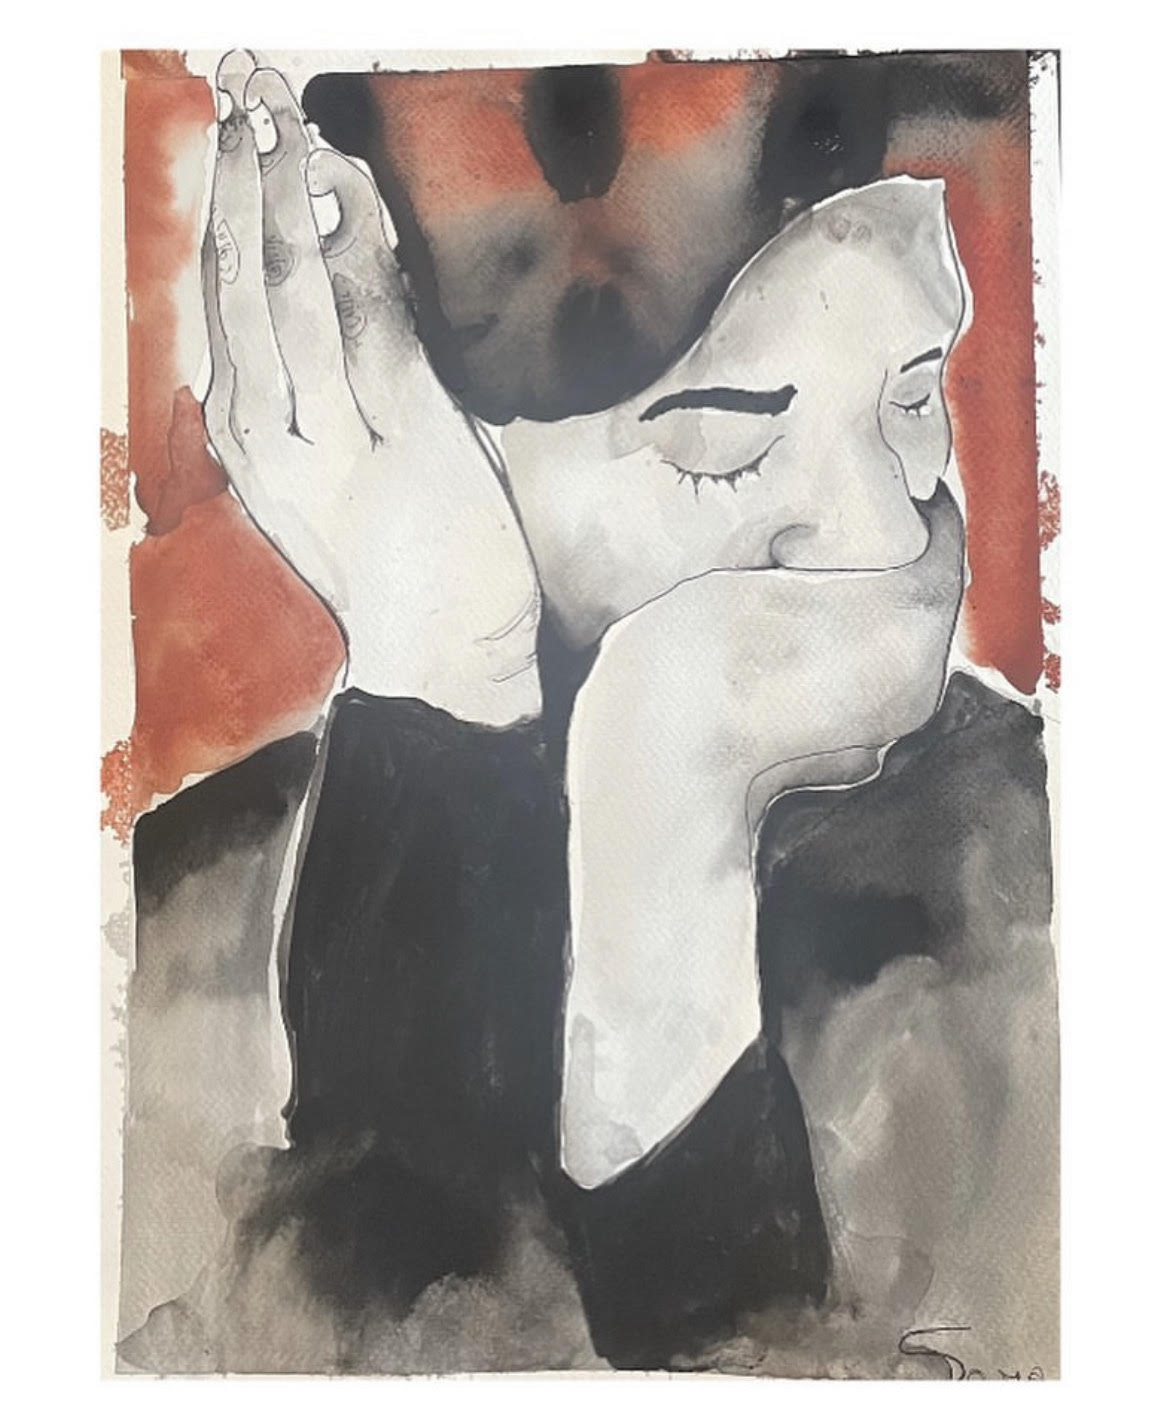
Our first featured artist spotlight is on Sonya Mendez. Sonya participated in her first ArtWalk when she was only in 7th grade, accompanied by parents but representing her artwork completely herself. She is now a freshman at Mandela International Magnet School, and recently won both a silver and a gold New Mexico Scholastic Art Awards. It has been such a pleasure to watch a young artist grow their craft and professionally present it to the world. All artwork featured in this post are by Sonya Mendez and were provided courtesy of the artist.
ArtWalk (AW): When did you start making art, and what prompted your creativity?
Sonya Mendez (SM): I’ve been doing art for as long as I can remember! Art had always been something that I liked doing, but I really started loving it until after attending the Georgia O’Keefe Art and Leadership summer program. The program introduced me to all different kinds of art…and how you can make and interpret it!
AW: What are your goals and dreams as an artist going forward?
SM: Right now, the biggest goal I have is to keep putting myself out there. Everything I’ve accomplished happened because someone pushed me out of my comfort zone to try something new. I don’t know yet what I want to do with my art as I get older, but I do know that trying new things can help me figure that out.
AW: Tell us more about your art – for example, what is your favorite medium, what styles do you like to work in, are there themes you follow?
SM: I love using watercolor paints. I’m definitively someone who’s scared of making mistakes, especially ones that can stand out a bit more when your using a bolder material like pen and pencil. When using watercolors, the mistakes I’m so afraid of making quite literally blend into each other, making the coolest patterns.
AW: Where do you most frequently create your art? Is it a dedicated space, outdoors, somewhere in your home, shared with other uses?
SM: Usually I make my art on the floor of my kitchen or living room. I don’t like to be alone when I paint, and I need the noises of my family around me to help me focus.
AW: What advice would you give to other artists that are just starting?
SM: Advice I would give to new artists- try new things!! Take chances!! Whether that be an opportunity to show your art off somewhere, or you experimenting with a different medium/style…trying new things is what will help you figure out what you want and what you love!
AW: Do you have a most used tool or tip that other artists should know about?
SM: Koi watercolors!! [ArtWalk thinks these Koi Watercolors are pretty cool too!]
AW: What is your favorite color?
SM: My favorite color is pink! It reminds me of summer. And it’s a color I don’t use a lot when I’m making art, so I think my eyes just like being shocked when they see such an unfamiliar color.
AW: What are your thoughts on and experiences with ArtWalk and vending so far?
SM: I love participating with ArtWalk Santa Fe!! It was one of the first experiences I had with putting myself out there, an event that made me feel not so scared about trying new things!
AW: Other than at ArtWalks, where can people find your artwork, either in person or online?
Want to add a touch of local charm and creativity to your gift-giving this year? Look no further than this curated list of the best Santa Fe Holiday Arts & Crafts Markets, where you’ll discover one-of-a-kind treasures crafted by talented artisans and small businesses. From intricate textiles to exquisite jewelry, these markets are a festive celebration of Santa Fe’s rich culture and artistry. Your holiday shopping can make a real difference by supporting local talent and creativity. So, skip the big-box stores and give the gift of uniqueness and community spirit this holiday season. Go Local, Go Different!
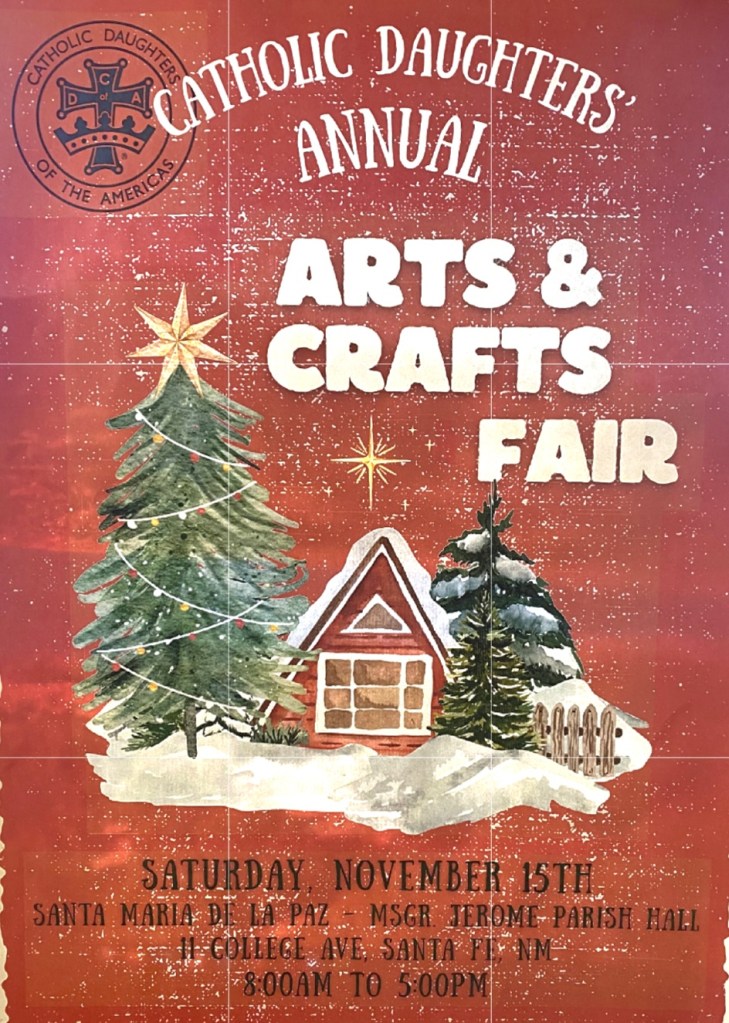
Catholic Daughters’ Annual Arts & Crafts Fair
Support local artisans! Great food and art. Proceeds go to local charities, scholarships, and local requests. We hope to see you there!
Saturday, November 15, 2025
8 am – 5 pm @ Santa Maria de la Paz, 11 College Ave., Santa Fe, NM, 87508
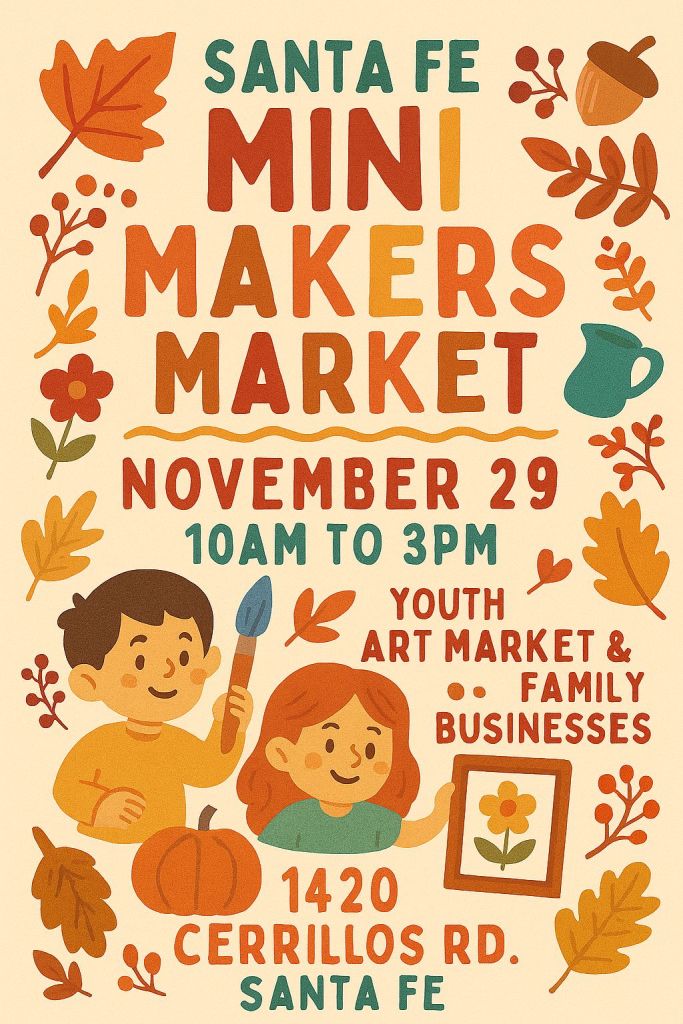
Santa Fe Mini Makers Market – Small Business Saturday!
his youth art market features talented young artists and entrepreneurs alongside family-run small businesses — all offering handmade goods, art, crafts, treats, and unique holiday gifts. Whether you’re looking for one-of-a-kind gifts or just want to cheer on the next generation of creators, this market is the place to be!
Saturday, November 29, 2025
10 am – 3 pm @ Center for Progress and Justice, 1420 Cerrillos Rd., Santa Fe 87505
The Velvet Cactus Christmas Market
Featuring over 30 local artisans with a fabulous selection of handmade gifts, delicious Christmas treats, and sweets. Festive atmosphere and Holiday cheer for all. Free admission, plenty of free parking.
Saturday, November 29, 2025
10 am – 4 pm @ St. John’s United Methodist Church, 1200 Old Pecos Trail, Santa Fe, NM 87505
6th Annual Case Trading Post Holiday Art Market
Holiday shop early! Buy directly from the artists, free admission this day and all weekend. Join the Wheelwright Museum of the American Indian over the holiday weekend for free entry to the museum, a lively atmosphere, and holiday shopping. Our Winter Market features new work by several indigenous artists. More info here.
Saturday, November 29, 2025
9 am – 3 pm @ Wheelwright Museum of the American Indian, 704 Camino Lejo, Santa Fe, NM 87505
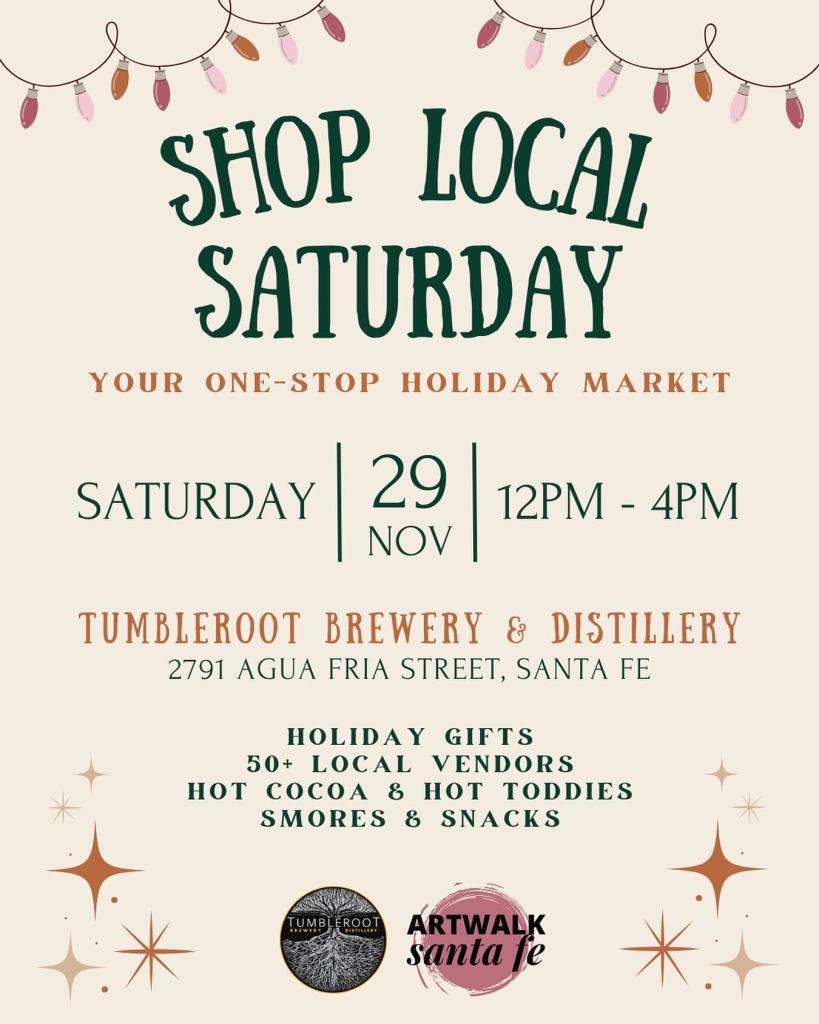
Shop Local Saturday Art Market & Holiday Party
Co-hosted by ArtWalk Santa Fe and Tumbleroot, this festive fete features local artisans showcasing their creations indoors, out on the patio, and even in the parking lot. Sip hot cocoa and cider, roast s’mores, and grab tasty bites from the house kitchen or the Smash Burger food truck—all amid twinkling lights, merry vibes, and perfect holiday shopping energy. Don’t miss the most fun you can have while checking off your gift list! More info here.
Saturday, November 29, 2025
12 pm – 4 pm @ Tumbleroot Brewery & Distillery, 2791 Agua Fria St, Santa Fe, NM 87505
SWAIA Winter Indian Market 2024
Celebrate 20 years of Winter Indian Market this Thanksgiving weekend. Buy art, meet the artists, enjoy music and food, and support Native economies. More info here and buy tickets here.
Saturday, November 29 and Sunday, November 30, 2025
Saturday: 10 am – 6 pm; Sunday: 9 am – 4 pm @ Santa Fe Community Convention Center, 201 W. Marcy St., Santa Fe, NM
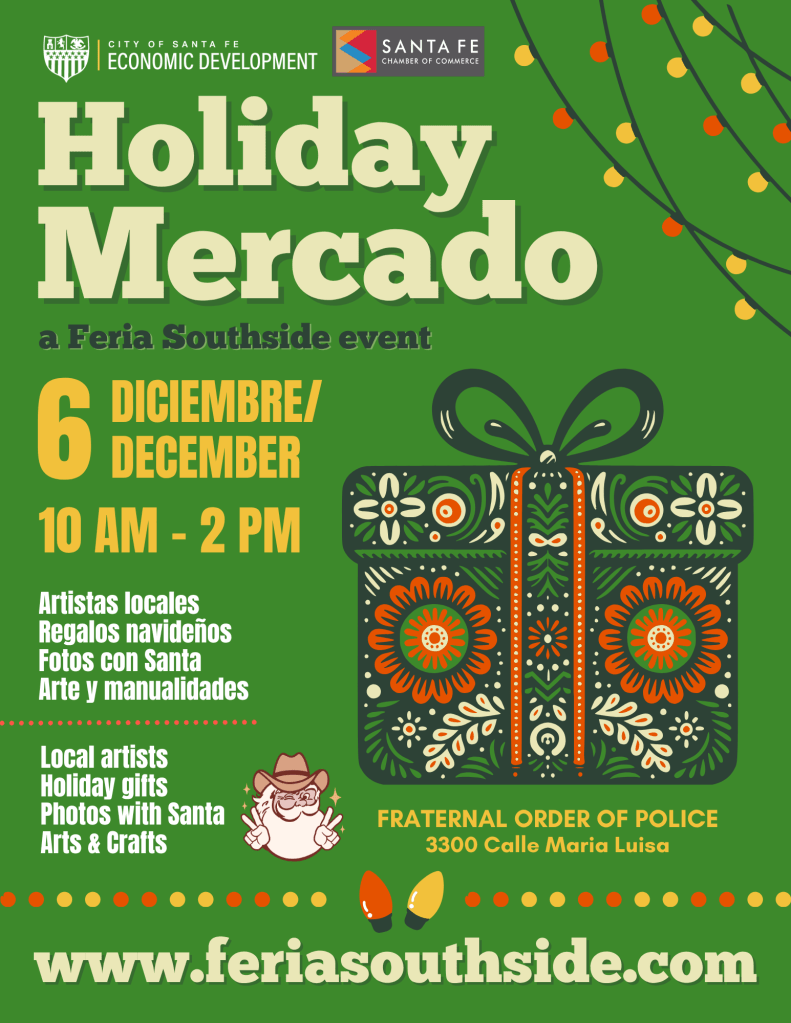
Holiday Mercado: Navidad
Celebrate the season Southside-style at this free community event! Shop handmade gifts, art, and local products while supporting Santa Fe’s small businesses, food vendors, and creative entrepreneurs. Enjoy free holiday arts & crafts, photos with Santa, and creative activities for all ages. Bring your family and friends to enjoy a cheerful community atmosphere and celebrate the spirit of Go Local this holiday season. Perfect for finding unique presents, connecting with neighbors, and discovering the creativity of Santa Fe’s Southside community. Free admission for all! More info >
Saturday, December 6, 2025
10 am – 2 pm @ Fraternal Order of Police, 3300 Calle Maria Luisa (in Airport Rd.)
PAC Holiday Bazaar
Join the Parent Advisory Council (PAC) Holiday Bazaar. This arts and crafts event offers free admission where you can shop from local artists and participate in raffles.
Saturday, December 6, 2025
9 am – 4 pm @ Everett F. Chavez Pueblo Pavilion, 1501 Cerrillos Rd, Santa Fe, NM 87505
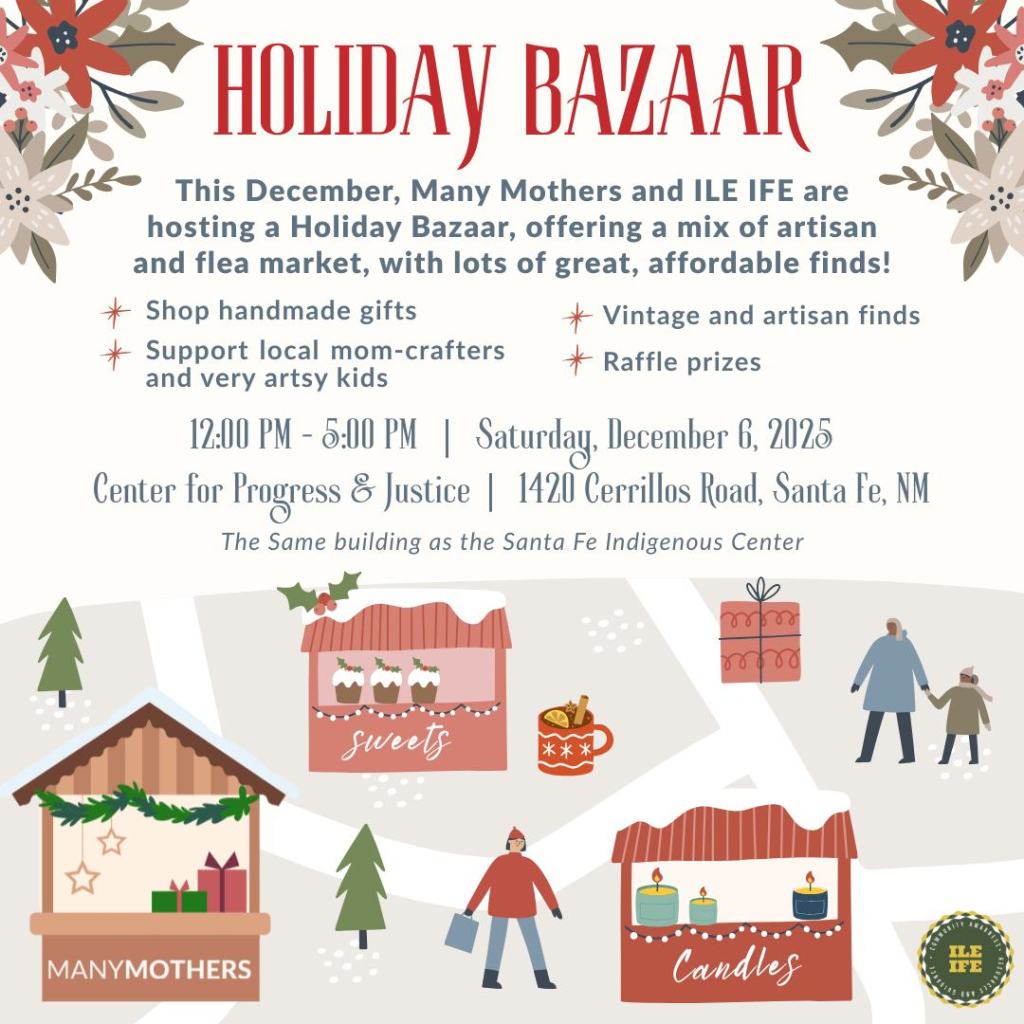
Holiday Bazaar
Browse beautiful art, find one-of-a-kind gifts, and support the talented makers in our community. A mix of flea market and artisan, you’ll find everything from vintage treasures to uniquely crafted offerings.
Saturday, December 6, 2025
12 – 5 pm @ Center for Progress and Justice, 1420 Cerrillos Rd., Santa Fe, NM 87505
First Sunday Holiday Market at Tumbleroot
The market is moving earlier for the winter! Join us every month from 12-4pm for our monthly art market featuring locally made jewelry, pottery, baked goods, and more while enjoying the seasonal drink menu at Tumbleroot. Now part of the Route 66 Centennial Celebration!
Sunday, December 7, 2025
12 – 4 pm @ Tumbleroot Brewery & Distillery, 2791 Agua Fria St, Santa Fe, NM 87505
Winter Earth Economy Mercado
A space for BIPOC artists, farmers, and healers to come together to sell or barter their goods. Why: We need each other. Our love and investment in community is stronger than capitalism, imperialism, and white supremacy which seek to divide our people. We carry deep memory of care-based economies rooted in reciprocity and sustainability so we invite you to remember them with us Bring your friends and family and support local this holiday season!
Sunday, December 7, 2025
11 am – 4 pm @ El Museo Cultural de Santa Fe, 555 Camino de la Familia, Santa Fe, NM 87501
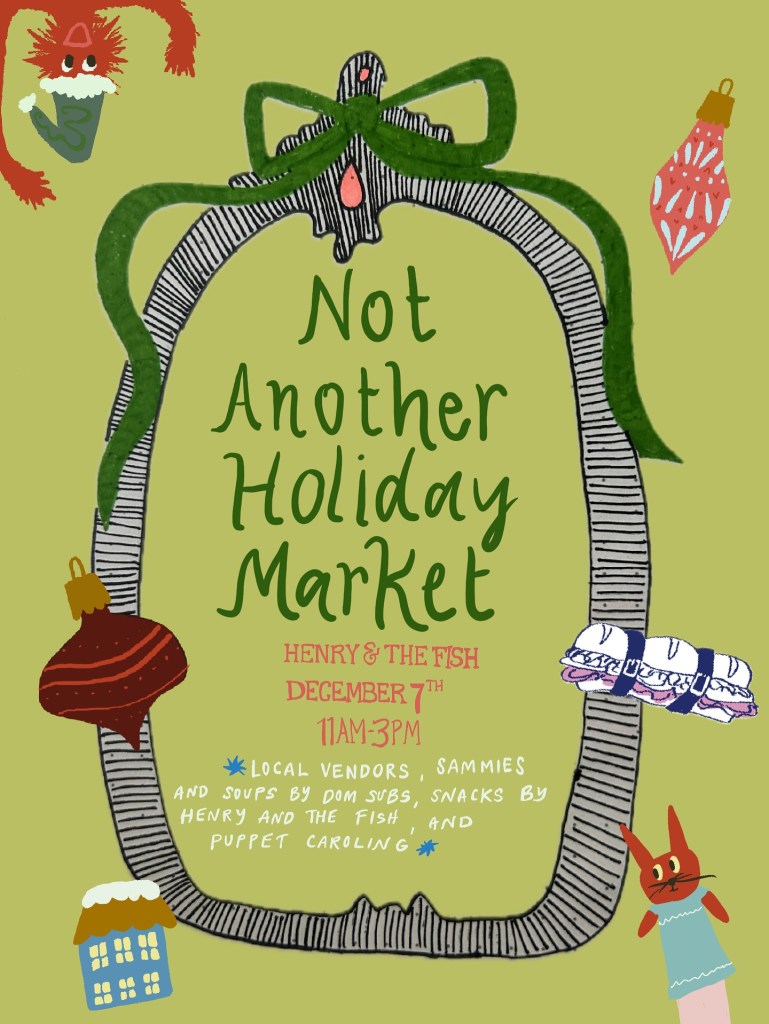
Not Another Holiday Market (Holiday Market)
Skip the malls (do those even exist still?)… Forget the mega-stores (mega-disappointing amiright?)…. Get same-day delivery and satisfaction that even Shmamazon can’t provide at this years’ NOT ANOTHER HOLIDAY MARKET! This holiday season, we’re keeping it local, weird and cute AF.
Sunday, December 7, 2025
11 am – 3 pm @ Henry & The Fish, 217 W San Francisco St, Santa Fe, NM 87501
Winter Spanish Market
Join us for a free, family-friendly event showcasing over 60 Traditional Spanish Market artists, along with talented mentored youth artists, live performances, and local cuisine — all set against the enchanting winter wonderland of Santa Fe. More info >
Saturday, December 6, and Sunday, December 7, 2025
Saturday: 9 am – 5 pm, Sunday: 9:30 am – 4:00 pm @ Santa Fe Community Convention Center, 201 W Marcy St, Santa Fe, NM 87501
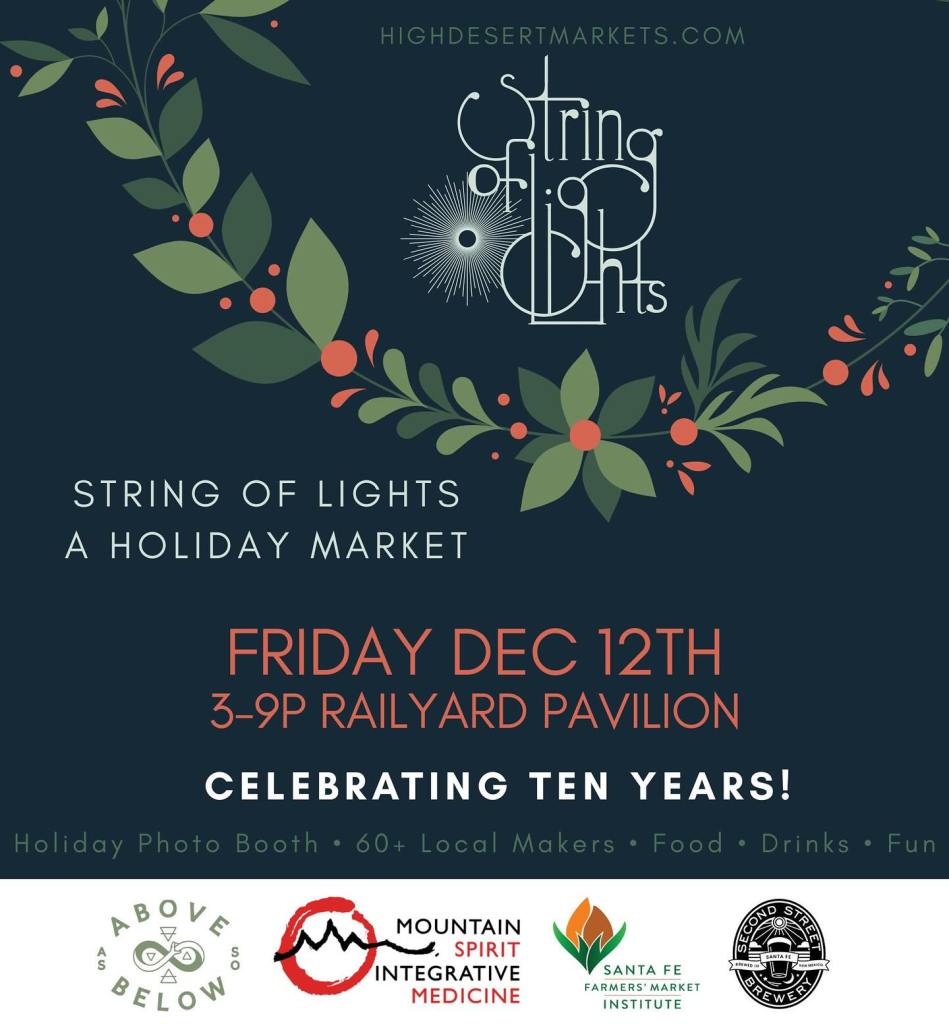
String of Lights Holiday Market
This popular holiday market comes back to the Railyard Pavilion for its tenth season and promises to curate an eclectic and diverse group of 60+ local artists, food, drink and holiday fun. Holiday Cocktails available for 21+ from As Above So Below, beer and wine from Second St. Brewery. More info >
Friday, December 12, 2025
3 – 9 pm @ Railyard Pavilion, 1607 Paseo de Peralta, Santa Fe, NM 87501
The Kitchen Table Santa Fe Winter Market
Stop by and meet makers, artists and KTSF food members! Handmade goodies, delicious food and drinks, desserts, art, pottery and all the in between!
Saturday, December 13, 2025
11 am – 3 pm @ The Kitchen Table Santa Fe, 313 Camino Alire
Governor’s Holiday Market
Celebrate the season at the first-ever Governor’s Holiday Market! Join Michelle Lujan Grisham in supporting dozens of New Mexico vendors and local artisans offering gifts that showcase the very best of our state’s creativity and craftsmanship. Enjoy carolers, light refreshments, prizes and more as you shop handcrafted goods from some of New Mexico’s most talented small businesses.
Saturday, December 13, 2025
3 – 7 pm @ New Mexico Governors Mansion, 1 Mansion Dr., Santa Fe, NM 87501
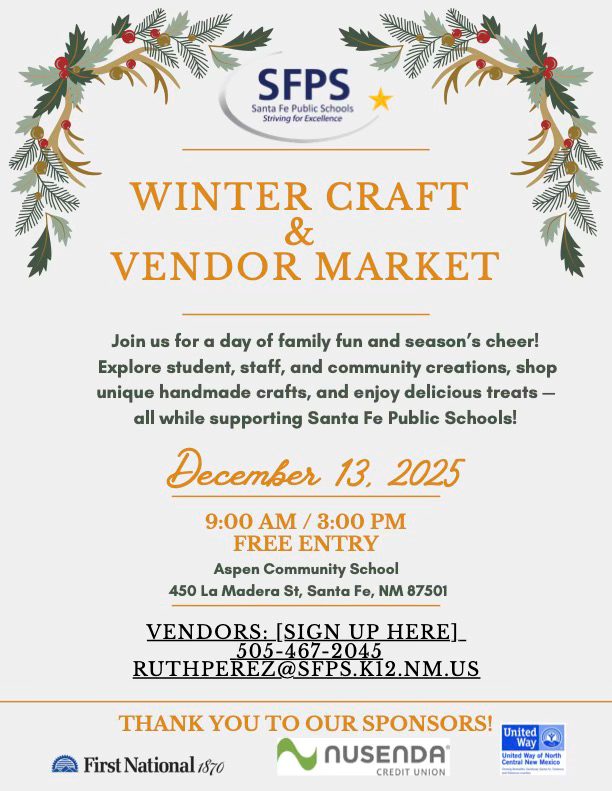
SFPS Winter Craft & Vendor Market
Join SFPS for a day of family fun and season’s cheer! Explore student, staff, and community creations, shop unique handmade crafts, and enjoy delicious treats while supporting Santa Fe Public Schools!
Saturday, December 13, 2025
9 am – 3 pm @ Aspen Community School, 450 La Madera St, Santa Fe, NM 87501
IAIA’s Holiday Art Market and SFCC’s Holiday Arts and Crafts Fair 2025
Over one hundred of the finest artists and craftspeople from across New Mexico will be setting up shop at these two holiday art markets. We encourage everyone to visit both campuses, which are only a six-minute drive or an 11-minute bike ride apart. Artists representing over 50 Indigenous nations and groups will be participating. Art available for purchase will include handcrafted beadwork, pottery, glasswork, bronze, wood carvings, jewelry, prints, paintings, textiles, ribbon shirts and skirts, quilts, stickers, and more. Concessions will be available, offering breakfast, lunch, and snacks. Admission and parking are free at both events.
Saturday, December 13, 2025
9 am – 4 pm @ Santa Fe Community College’s Main Hallway and Campus Center at 6401 Richards Ave & IAIA’s Performing Arts and Fitness Center and it the Library and Technology Building at 83 Avan Nu Po Road.
Guadalupe St. Winter Walk
Guadalupe St. will be closed to traffic from Paseo to Manhattan from 3-7pm! Stroll along the farolitos and bonfires while listening to live music and engaging with all of the festive activities!
Saturday, December 13, 2025
3 – 7 pm @ From North Paseo de Peralta to Manhattan Ave. in Downtown Santa Fe
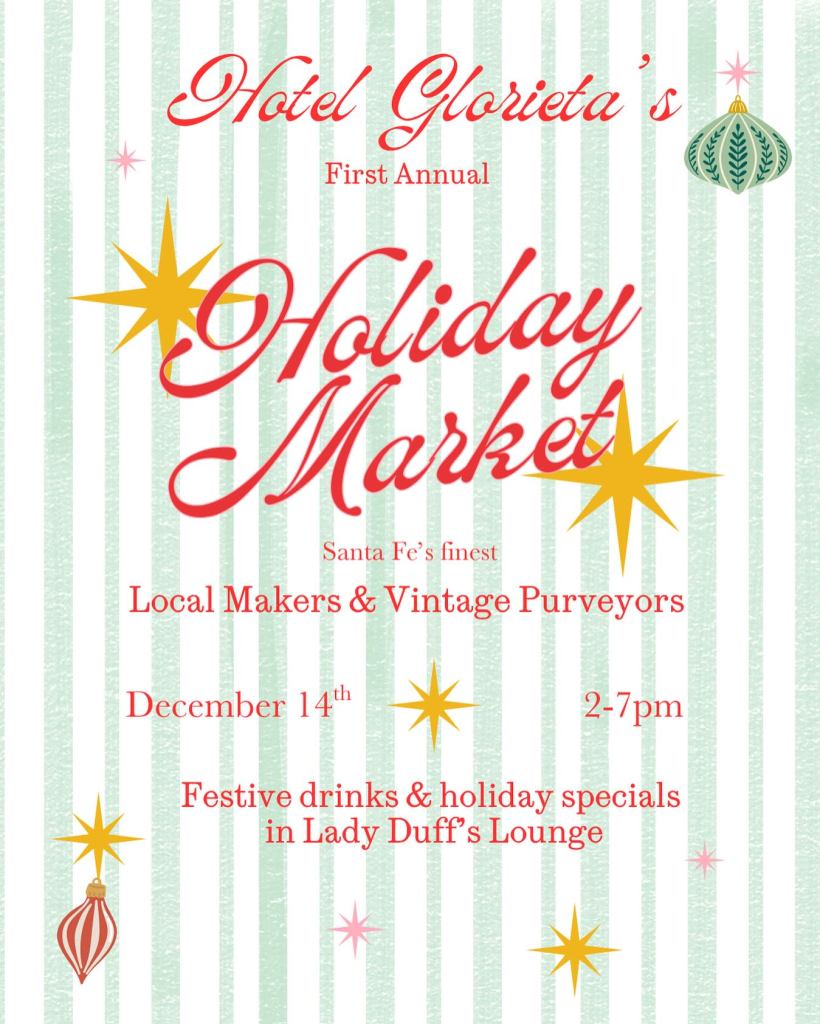
Hotel Glorieta’s First Annual Holiday Market
Welcoming amazing makers and sellers to their first winter market in the Maravilla Ballroom at Hotel Glorieta. Come get your wares and stop by @ladyduffslounge for libations and bites. Or come by Lady Duff’s THEN stroll the ballroom, yummy cocktail in hand.
Sunday, December 14, 2025
2 – 7 pm @ Hotel Glorieta, 750 N St Francis Dr, Santa Fe, NM 87501
Lena Street Holiday Market
An afternoon of festive shopping, local makers, good eats, and plenty of holiday cheer.
Saturday, December 13, 2025
12 – 5pm @ 1600 Lena St., Santa Fe, NM 87505
Santa Fe Mini Makers Market
The Santa Fe Mini Makers Market (SFMMM) is a youth-centered event designed to give kids a safe, fun, and affordable space to sell their art, crafts, and creations. It’s all about building confidence, connecting with others, and exploring what it means to be a creative entrepreneur. They also welcome family businesses that align with their mission — this market is a place for everyone to share their talents and sell their art affordably.
Saturday, December 20, 2025
10 am – 3 pm @ Center for Progress and Justice, 1420 Cerrillos Rd., Santa Fe 87505
We’ll continue to update this blog post as more markets are announced so stay tuned!